
stable-diffusion-webui
这是基于Gradio开发的Stable Diffusion可视化网页操作工具,支持文生图、图生图、图像修复放大、风格定制等多种AI图像生成相关功能。
这个项目值得继续研究吗?
这是基于Gradio开发的Stable Diffusion可视化网页操作工具,支持文生图、图生图、图像修复放大、风格定制等多种AI图像生成相关功能。
- 解决什么问题
- 此前企业开展AI图像生成相关工作需要对接复杂技术接口,无可视化操作界面非技术人员无法直接使用,参数调整、风格定制、图像修复的流程繁琐,效率偏低。
- 适合什么团队
- 适合有AI图像生成需求的设计、营销、内容创作团队,以及需要搭建内部AI绘图工具的企业技术团队使用。
- 使用前注意
- 采用AGPL-3.0许可证,修改后对外提供服务需开源修改部分的代码;推荐使用英伟达GPU部署,最低支持2GB显存,4GB及以上显存运行更流畅。
本页用于缩短初步筛选时间,不构成技术、采购或法律结论。 正式使用前请在真实业务数据上验证,并以官方说明与许可证为准。
从官方资料看清能力、部署与采用边界
以下内容依据项目公开 README 或模型卡翻译整理,代码、命令和产品名保持原样。
项目导读
1. 项目定位
Stable Diffusion web UI是基于Gradio库开发的Stable Diffusion(开源AI图像生成大模型)可视化操作界面,核心目标是降低AI图像生成能力的使用门槛,无需掌握代码即可操作各类AI图像生成相关功能,也可通过API对接业务系统实现批量调用。
2. 核心能力
项目覆盖AI图像生成全流程常见需求,核心能力包括:
- 基础生成能力:支持文生图(txt2img)、图生图(img2img)两种核心生成模式,同时支持局部补绘(Inpainting)、外延扩图(Outpainting)、多参数对比生成、批量生成等扩展能力。
- 图像优化能力:自带超分放大、面部修复工具,支持GFPGAN、CodeFormer、RealESRGAN等多种主流优化模型,可快速修复生成图的面部瑕疵、提升图像分辨率。
- 提示词与参数调整能力:支持提示词权重设置、负面提示词(指定生成图中不允许出现的内容)、风格预设保存、生成种子调整、高分辨率修复等功能,可灵活控制生成效果。
- 进阶定制能力:支持Textual Inversion、LoRA(低秩适配,一种轻量微调AI图像模型的技术,可快速定制生成特定风格、特定主体的图像)、超网络等自定义模型组件的加载与训练,也支持最多3个基础模型合并,快速生成自定义风格的基础模型。
- 效率辅助能力:生成图自动保存所有生成参数,拖入历史生成图即可自动恢复对应参数,无需手动记录;支持生成过程预览、随时中断生成、剩余时间预估等功能,降低操作成本。
- 扩展能力:支持社区自定义插件,可按需扩展历史图像管理、美学梯度生成等额外功能。
3. 典型使用方式
非技术用户可直接通过网页界面操作:
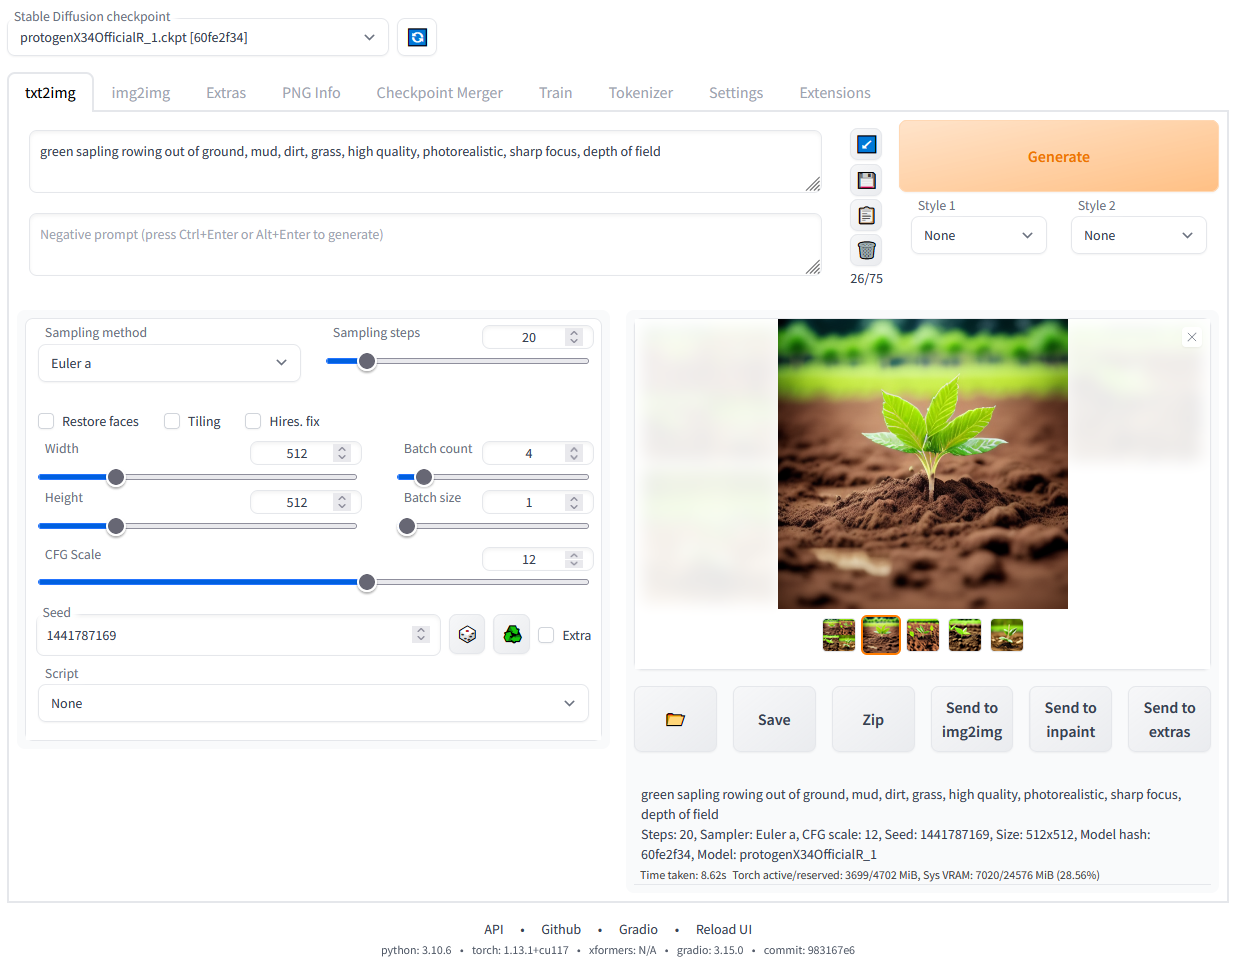
- 文生图场景:在对应页面输入内容描述提示词,将不需要出现的内容填入负面提示词框,选择采样方式、生成尺寸、生成数量后点击生成即可获取结果。
- 图生图场景:上传参考图像,调整生成相似度参数,搭配提示词即可生成内容、风格与参考图接近的新图像,也可选择局部擦除重绘、整体扩图等操作。
- 图像优化场景:在附加功能页面上传待优化图像,选择对应放大、面部修复工具即可完成优化。
技术团队可调用项目自带的API,将AI图像生成能力对接至内部内容管理、营销素材生成等业务系统,实现批量自动化生成。
4. 部署要求
项目支持多种硬件、系统环境部署:
- 硬件要求:推荐使用英伟达GPU部署,最低支持2GB显存运行,4GB及以上显存运行更流畅;也支持AMD GPU、英特尔CPU/GPU、昇腾NPU部署,对应硬件有单独的官方安装文档。
- 系统与软件要求:支持Windows、Linux、苹果硅设备运行,安装需提前准备Python 3.10/3.11、Git环境,官方提供一键安装脚本,Windows可直接运行run.bat、Linux运行webui.sh完成部署。
- 轻量使用方案:无需本地部署,可直接使用Google Colab等在线服务运行项目,满足临时使用需求。
5. 许可证与采用建议
项目采用AGPL-3.0许可证,若仅在企业内部部署使用,无需开源修改后的代码;若对外部用户提供基于本项目修改后的部署服务,则需要开源对应修改部分的代码。
对于需要搭建内部AI绘图工具的企业,该项目功能覆盖全面,有大量社区扩展插件可按需选配,无需额外开发操作界面即可快速上线使用,适配设计、营销、内容创作等多团队的图像生成需求。若计划对外提供商用AI绘图服务,需提前评估AGPL-3.0许可证的合规要求。
官方资料与来源
- ai
- ai-art
- deep-learning
- diffusion
- gradio
- image-generation
- image2image
- img2img
- pytorch
- stable-diffusion
- text2image
- torch
## Installation and Running
Make sure the required [dependencies](https://github.com/AUTOMATIC1111/stable-diffusion-webui/wiki/Dependencies) are met and follow the instructions available for:
- [NVidia](https://github.com/AUTOMATIC1111/stable-diffusion-webui/wiki/Install-and-Run-on-NVidia-GPUs) (recommended)
- [AMD](https://github.com/AUTOMATIC1111/stable-diffusion-webui/wiki/Install-and-Run-on-AMD-GPUs) GPUs.
- [Intel CPUs, Intel GPUs (both integrated and discrete)](https://github.com/openvinotoolkit/stable-diffusion-webui/wiki/Installation-on-Intel-Silicon) (external wiki page)
- [Ascend NPUs](https://github.com/wangshuai09/stable-diffusion-webui/wiki/Install-and-run-on-Ascend-NPUs) (external wiki page)

Alternatively, use online services (like Google Colab):

- [List of Online Services](https://github.com/AUTOMATIC1111/stable-diffusion-webui/wiki/Online-Services)

### Installation on
该片段来自项目 README,仅用于初步判断;实际部署请以官方文档为准。
核对上游原始说明节选
Stable Diffusion web UI
Stable Diffusion web UI
A web interface for Stable Diffusion, implemented using Gradio library.
Features
Detailed feature showcase with images:
- Original txt2img and img2img modes
- One click install and run script (but you still must install python and git)
- Outpainting
- Inpainting
- Color Sketch
- Prompt Matrix
- Stable Diffusion Upscale
- Attention, specify parts of text that the model should pay more attention to
- a man in a ((tuxedo)) - will pay more attention to tuxedo
- a man in a (tuxedo:1.21) - alternative syntax
- select text and press Ctrl+Up or Ctrl+Down (or Command+Up or Command+Down if you're on a MacOS) to automatically adjust attention to selected text (code contributed by anonymous user)
- Loopback, run img2img processing multiple times
- X/Y/Z plot, a way to draw a 3 dimensional plot of images with different parameters
- Textual Inversion
- have as many embeddings as you want and use any names you like for them
- use multiple embeddings with different numbers of vectors per token
Installation and Running
Make sure the required dependencies are met and follow the instructions available for:
- NVidia (recommended)
- AMD GPUs.
- Intel CPUs, Intel GPUs (both integrated and discrete) (external wiki page)
- Ascend NPUs (external wiki page)
Alternatively, use online services (like Google Colab):
- List of Online Services
Installation on Windows 10/11 with NVidia-GPUs using release package
- Download sd.webui.zip from v1.0.0-pre and extract its contents.
- Run update.bat.
- Run run.bat.
For more details see Install-and-Run-on-NVidia-GPUs
Automatic Installation on Windows
- Install Python 3.10.6 (Newer version of Python does not support torch), checking "Add Python to PATH".
- Install git.
- Download the stable-diffusion-webui repository, for example by running git clone https://github.com/AUTOMATIC1111/stable-diffusion-webui.git.
- Run webui-user.bat from Windows Explorer as normal, non-administrator, user.
Automatic Installation on Linux
- Install the dependencies:
# Debian-based:
sudo apt install wget git python3 python3-venv libgl1 libglib2.0-0
# Red Hat-based:
sudo dnf install wget git python3 gperftools-libs libglvnd-glx
# openSUSE-based:
sudo zypper install wget git python3 libtcmalloc4 libglvnd
# Arch-based:
sudo pacman -S wget git python3
If your system is very new, you need to install python3.11 or python3.10:
# Ubuntu 24.04
sudo add-apt-repository ppa:deadsnakes/ppa
sudo apt update
sudo apt install python3.11

# Manjaro/Arch
sudo pacman -S yay
yay -S python311 # do not confuse with python3.11 package

# Only for 3.11
# Then set up env variable in launch script
export python_cmd="python3.11"
# or in webui-user.sh
python_cmd="python3.11"- Navigate to the directory you would like the webui to be installed and execute the following command:
wget -q https://raw.githubusercontent.com/AUTOMATIC1111/stable-diffusion-webui/master/webui.shOr just clone the repo wherever you want:
git clone https://github.com/AUTOMATIC1111/stable-diffusion-webui- Run webui.sh.
- Check webui-user.sh for options.
Installation on Apple Silicon
Find the instructions here.
Contributing
Here's how to add code to this repo: Contributing
Documentation
The documentation was moved from this README over to the project's wiki.
For the purposes of getting Google and other search engines to crawl the wiki, here's a link to the (not for humans) crawlable wiki.
Credits
Licenses for borrowed code can be found in Settings -> Licenses screen, and also in html/licenses.html file.
- Stable Diffusion - https://github.com/Stability-AI/stablediffusion, https://github.com/CompVis/taming-transformers, https://github.com/mcmonkey4eva/sd3-ref
- k-diffusion - https://github.com/crowsonkb/k-diffusion.git
- Spandrel - https://github.com/chaiNNer-org/spandrel implementing
- GFPGAN - https://github.com/TencentARC/GFPGAN.git
- CodeFormer - https://github.com
 优秘智能
优秘智能